Installing LVP flooring is a popular DIY project that can add a stylish and durable touch to any home. With its water-resistant properties and easy maintenance, luxury vinyl plank flooring has become a go-to choice for homeowners seeking a budget-friendly alternative to hardwood. When installing LVP flooring, it’s crucial to prepare the subfloor properly to ensure a smooth and level surface. Once the subfloor is ready, you can begin laying the LVP planks by following the manufacturer’s instructions. Be sure to use a locking system to secure the planks together and create a seamless appearance. LVP flooring is available in a wide range of colors, textures, and styles, allowing you to find the perfect match for your home’s decor. Whether you’re looking to install LVP flooring in your living room, bedroom, or kitchen, this versatile material offers a durable and stylish solution.
Preparation and Tools Needed
Preparation
Embarking on the installation of Luxury Vinyl Plank (LVP) flooring requires meticulous preparation to ensure a seamless and professional finish. The first step in the process involves gathering all necessary tools and materials. Essential tools include a tape measure, utility knife, straight edge, rubber mallet, pull bar, tapping block, and a set of spacers. Additionally, ensure you have a floor roller and a vacuum handy to manage subfloor preparation and cleanup.
Measure accurately
Before beginning the installation, it is paramount to measure the space accurately. Utilize the tape measure to determine the length and width of the room, ensuring to multiply these dimensions to get the total square footage. This precise calculation aids in purchasing the correct amount of LVP flooring, including any additional planks for cuts and waste.
Choosing right type of LVP flooring
Choosing the right type of LVP flooring is the next critical element. LVP flooring comes in various styles and thicknesses, each suited to different applications and levels of foot traffic. Select a flooring type that complements the aesthetic of your space while providing the durability required to withstand daily use. Pay attention to the manufacturer’s recommendations for installation methods and subfloor requirements.
Installing LVP Flooring on Concrete
Installing LVP Flooring on Concrete
When installing Luxury Vinyl Plank (LVP) flooring on a concrete surface, proper preparation and technique are essential for a successful installation. The process involves three primary stages: subfloor preparation, moisture barrier installation, and laying the LVP planks. Each stage is crucial for ensuring the longevity and durability of your new LVP flooring.
Subfloor Preparation
The first step in installing LVP flooring on concrete is preparing the subfloor. Begin by thoroughly cleaning the concrete surface to remove any dirt, dust, or debris. Use a broom or vacuum to ensure the area is completely clean. Next, inspect the concrete for any cracks or low/high spots. Use a concrete filler to seal any cracks and apply a concrete leveler to ensure the surface is smooth and even. A level subfloor is critical as it prevents the LVP planks from shifting or deteriorating prematurely.
Moisture Barrier Installation
Concrete floors are known to absorb and retain moisture, which can damage LVP flooring over time. Installing a moisture barrier is vital in protecting the new planks. Choose a high-quality underlayment specifically designed as a moisture barrier for concrete subfloors. Roll out the underlayment according to the manufacturer’s instructions, ensuring full coverage of the entire floor. Overlap the edges to prevent any gaps, as even small openings can allow moisture to seep through.
Laying the LVP Planks
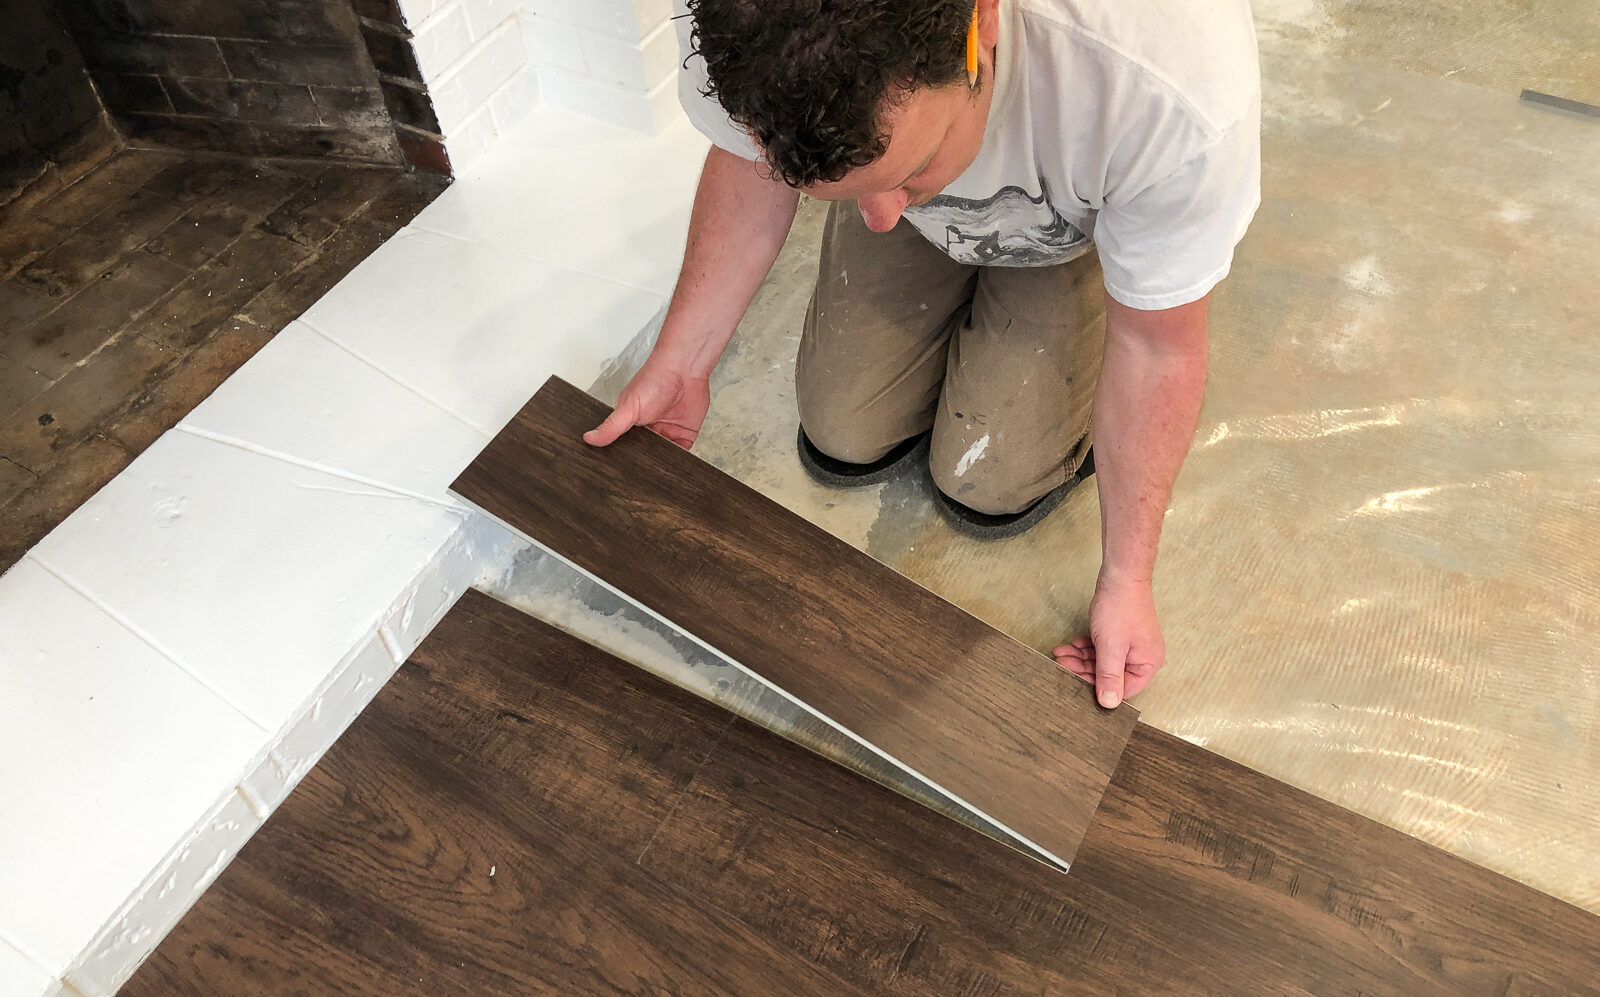
With the subfloor prepared and moisture barrier in place, you can proceed to lay the LVP planks. Start by determining the layout of the planks, noting how they should be staggered to create a natural, aesthetically pleasing appearance. Use spacers to maintain consistent expansion gaps between the planks and the wall. Begin laying the planks in a corner, working your way across the room. When you reach any obstacles such as doorways or pillars, measure and cut the planks to fit precisely around them. A utility knife or a vinyl plank cutter can be used for accurate cuts.


Installing LVP Flooring on Stairs
Installing Luxury Vinyl Plank (LVP) flooring on stairs requires meticulous attention to detail to ensure a seamless and durable finish. The process encompasses measuring and cutting, gluing and securing, and applying finishing touches to enhance the overall appearance.
Measuring and Cutting
Begin by precisely measuring each step, including the width and depth of treads and risers. It is crucial to measure each stair individually as dimensions can vary. Once measurements are recorded, transfer them onto the LVP planks. Carefully use a utility knife or a circular saw to cut the planks to the exact size. Ensuring accurate cuts is essential for a snug fit and professional look.
Gluing and Securing
Before applying the adhesive, prepare the stairs by ensuring they are clean, dry, and free of any debris. Apply an appropriate flooring adhesive to the step, starting with the tread. Press the LVP plank firmly onto the adhesive, ensuring it is properly aligned. Use a roller or a weight to press the plank down firmly, guaranteeing strong adhesion. Repeat the process for the risers, applying the adhesive and securing the planks in place. Be meticulous in this step to avoid any gaps or misalignments.
Finishing Touches
To achieve a polished look, pay special attention to the edges of the stairs. Use stair nosing to cover the edges of the treads for a smooth transition. Stair nosing not only adds a finished appearance but also provides additional safety by reducing the risk of slips and falls. If necessary, add trim or molding to the sides of the stairs to cover any exposed gaps. Ensure all components are securely attached and aligned for a cohesive and professional finish.
By following these detailed instructions, you can achieve a high-quality LVP flooring installation on your stairs, enhancing both the aesthetics and functionality of your home.
![]() & Free shipping
& Free shipping
$24.99
![]() & Free shipping
& Free shipping
![]() & Free shipping
& Free shipping
![]() & Free shipping
& Free shipping
$31.99
Installing LVP Flooring in the Bathroom
When it comes to installing Luxury Vinyl Plank (LVP) flooring in a bathroom, special attention needs to be paid to moisture considerations, subfloor preparation, and plank installation. Given the high humidity and frequent splashes of water, ensuring proper installation is crucial for durability and longevity.
Moisture Considerations
The bathroom environment demands the selection of water-resistant LVP flooring. Opt for products specifically labeled as “waterproof” or “water-resistant” to withstand the moisture-prone conditions effectively. Additionally, applying a moisture barrier is highly recommended. This can be a sheet of plastic or a specialized underlayment designed to protect the subfloor from potential water damage. The moisture barrier acts as the first line of defense, preventing any water from seeping through the seams and affecting the subfloor.
Subfloor Preparation
Preparing the subfloor is a critical step in achieving a smooth and durable LVP installation. Focus on cleaning and leveling the subfloor thoroughly; any dirt or uneven spots could create issues later. Pay special attention to areas around the toilet and bathtub/shower. These zones are more susceptible to water exposure. Ensure that they are sealed properly with a high-quality caulk or sealant. Doing this helps to create a waterproof barrier, preventing any water from creeping underneath the LVP planks.
Plank Installation
Installing LVP planks in the bathroom requires precise cutting to fit around fixtures and in tight spaces. Start by laying out the planks in a manner that allows for minimal cutting and wasting of material. Carefully measure and cut the planks to fit snugly around the toilet base, bathtub, and any other fixtures. A key tool for these tasks is a jigsaw, which allows for intricate cuts without compromising the plank’s integrity. When positioning the planks, leave a slight expansion gap along walls and fixtures to accommodate any slight shifting due to temperature or humidity changes.
To conclude, when done correctly, installing LVP flooring in the bathroom can provide a beautiful, durable, and water-resistant solution that withstands the unique challenges of a moisture-rich environment.
Installing LVP Flooring in the Basement
Basements present unique challenges when it comes to installing Luxury Vinyl Plank (LVP) flooring. These spaces are particularly susceptible to moisture, which can lead to issues if not properly managed. Before beginning any LVP flooring project in the basement, it’s crucial to address these conditions.
Moisture and the importance of a vapor barrier
First, let’s consider moisture and the importance of a vapor barrier. Basements, being partially or wholly below ground level, often experience higher humidity levels. This elevated moisture can seep into the flooring and cause warping or mold growth. To prevent this, installing a vapor barrier is essential. Start by thoroughly cleaning the basement floor to remove any dirt or debris. Once cleaned, measure and cut sections of a 6-mil polyethylene vapor barrier to fit the area. Ensure the barrier covers the entire surface, extending a few inches up the walls if possible. Seal seams with waterproof tape to create a continuous, effective shield against moisture.
Assess the subfloor’s condition
Next, assess the subfloor’s condition. Basements may have concrete or other types of subflooring, which must be smooth and level for a successful LVP flooring installation. Inspect the subfloor for cracks, uneven areas, or other imperfections. Small cracks can be filled with a suitable concrete filler or patching compound, while larger issues may require professional repair. Use a level to check for evenness across the entire surface. Uneven sections can be smoothed using a self-leveling compound, ensuring a stable foundation for the LVP flooring.
Begin laying the LVP planks
Once the vapor barrier is in place and the subfloor prepared, you can begin laying the LVP planks. As basements experience temperature fluctuations, it’s important to leave an expansion gap around the room’s perimeter to accommodate these changes. Start by acclimating the LVP flooring to the basement environment for at least 48 hours. When ready, begin installation from one corner, using spacers to maintain the expansion gap. Lay the planks row by row, ensuring a tight fit and staggered seams for a natural look. Follow the manufacturer’s instructions for best results, and periodically check that the flooring remains level as you progress.
Installing LVP Flooring in the Kitchen
Move kitchen appliances out of the way
When installing Luxury Vinyl Plank (LVP) flooring in the kitchen, it is crucial to follow a systematic approach to ensure durability and aesthetic appeal. Begin by safely moving kitchen appliances out of the way. Large appliances such as refrigerators and ovens need to be handled carefully to avoid damage to both the appliance and the floor. Utilize furniture sliders or an appliance dolly to aid in moving heavy objects. Ensure all appliances are unplugged and, if possible, gas lines disconnected before moving.
Subfloor preparation
Next, focus on subfloor preparation. The subfloor must be clean, dry, and level before laying down any LVP flooring. Begin by thoroughly sweeping and vacuuming to remove dust and debris. Pay special attention to grease spots or spills, as these can affect the adhesion of the flooring. Use a degreaser to clean up stubborn spills, and ensure the subfloor is completely dry before proceeding. Address any uneven areas by sanding down high spots or using a leveling compound to fill in dips, ensuring a smooth, level surface for the planks to adhere to.
Start laying the LVP planks
With the subfloor prepared, start laying the LVP planks. Begin at the farthest corner of the room, laying the first row of planks parallel to the longest wall, ensuring a straight line. Use spacers to maintain a small expansion gap between the planks and the wall. When navigating around kitchen cabinetry and islands, measure carefully, and cut the planks to fit using a utility knife or a vinyl flooring cutter. For areas around the sink and other fixtures, precise measurements and cuts are essential to ensure a seamless fit.
Installing LVP Flooring Over Tile
Examine the tile surface for any unevenness, cracks, or damages
When embarking on the project of installing Luxury Vinyl Plank (LVP) flooring over existing tile, the initial step is to conduct a thorough assessment of the current tile floor. Begin by examining the tile surface for any unevenness, cracks, or damages. It is crucial that the tile provides a level and stable foundation for the LVP. Use a straight edge or leveling device to identify any high spots or dips. Minor imperfections can be remedied with a floor-leveling compound, while more significant issues might necessitate replacing or repairing damaged tiles before proceeding.
Install an underlayment
Once the tile floor has been assessed and appropriately prepared, the next step is to install an underlayment. The underlayment is essential as it acts as a buffer between the rigid tile and the flexible LVP, preventing any irregularities from affecting the final appearance and performance of the flooring. Choose an underlayment that is compatible with LVP and designed to offer sound insulation and moisture protection. Roll out the underlayment across the entire tile surface, adhering to the manufacturer’s guidelines to ensure it is flat and smoothly fitted, as this will significantly impact the smooth installation of the LVP planks.
Lay the LVP planks
With the underlayment securely in place, you can now proceed to lay the LVP planks. Begin by planning the layout, typically starting from one wall and working your way across the room. Use spacers along the walls to maintain the necessary expansion gap as recommended by the LVP manufacturer. Align the first row of planks and snap them together, ensuring each plank is tightly connected. Continue this process, row by row, staggering the ends of the planks for a natural and aesthetically pleasing appearance. Use a utility knife to trim the planks as needed when fitting around obstacles or irregularities. Periodically check your work to make sure the planks remain aligned and flat. Properly installed, LVP flooring offers a durable, attractive finish that brilliantly overlays existing tile surfaces.
Installing LVP Flooring Backwards
There are unique circumstances where installing Luxury Vinyl Plank (LVP) flooring backwards might be necessary. Common scenarios include intricate floor plans, tight corners, or maneuvering around fixed obstacles such as kitchen islands or built-in fixtures, which might prevent the standard forward installation method. When faced with these challenges, installing LVP backwards can be a practical solution to ensure all areas are covered without compromising the overall layout.
Select a starting point that has the least obstructions
The process of installing LVP flooring backwards starts with selecting a starting point that has the least obstructions. Begin by laying the first row of planks adjacent to the obstacles or along the most complex layout. Ensure the tongue side is facing outwards for easier insertion of subsequent planks. Align the first plank against the wall or obstacle, maintaining an appropriate expansion gap to accommodate potential flooring movement.
Stagger the joints
Next, stagger the joints as you would with a standard installation to create a natural look and maximize the floor’s stability. Join the planks by inserting the tongue of the new plank into the groove of the previously laid plank. Keep the planks at a slight angle to fit them together securely, then gently press down until they snap into place. Continue this process, ensuring each plank is correctly aligned before moving on to the next one.
Troubleshoot common issues
Troubleshooting common issues during backward installation is crucial to maintaining the integrity and aesthetic of the LVP flooring. Misalignment can be a common problem, often rectified by readjusting the plank and ensuring that the tongue-and-groove mechanism is properly engaged. Gaps between planks might occur if they are not aligned perfectly, so carefully inspect each connection as you progress. Stability issues can be minimized by using spacers to uphold the expansion gap and prevent movement during installation.
Summary
While installing LVP flooring backwards is not typical, it is sometimes necessary to accommodate complex layouts or obstacles. By following a systematic approach and paying close attention to alignment and stability, you can achieve a seamless and professional-looking result.
Read more articles:


